A supportive family – from immediate carers through to other family members – can play an important role in the practical and emotional wellbeing of someone living with low vision or blindness.
If someone in your family has been diagnosed with low vision or blindness, there is support available to you so you can maintain your own emotional wellbeing and continue to help your loved ones navigate their own journey with low vision or blindness. Guide Dogs works closely with family members through a range of services so they’re equipped to be carers and supporters of their loved ones.
Understanding low vision
‘Low vision’ is a term used to describe a range of conditions that affect sight, with many conditions varying in nature and severity across a spectrum. It includes conditions such as macular degeneration, glaucoma, cataracts, diabetic retinopathy and retinitis pigmentosa. You can learn more about low vision and check out helpful articles on our ‘About Low Vision’ page.
According to the Australian Institute of Health and Welfare, approximately 13 million Australians have one or more chronic eye conditions. 7.2 million of these live with hyperopia (long-sightedness) and 6.3 million with myopia (short-sightedness). 131,000 live with complete or partial blindness.
Because vision conditions are so varied in nature and severity, the role of family in supporting someone with low vision is equally as diverse. Some family members might take on a regular caring role whilst others might be relied upon for irregular or just emotional support.
Practical support you can provide
One of the most common concerns from family members caring for someone with low vision or blindness revolves around guiding them through a built environment. Here are some tips for helping your loved one navigate public spaces.
Ask: Talk with your loved one and ask questions about how they want to be supported. Then remember to always ask before assisting them.
Offer: Rather than taking the arm or hand of your loved one, allow them to take your own arm so they can manage their balance and movements more actively.
Communicate: Make sure you clearly inform your loved one of any upcoming steps, changes in terrain or direction as well as obstacles.
Respect: It’s helpful to remember that you’re a support person for a loved one when assisting them. This can stop you from over-assisting them and instead anticipating their needs.
Pause: It can be helpful to assist the person you are supporting take stock and orient themselves in new environments. This means not rushing through spaces but allowing for time to absorb and process different cues.
Other practical areas you can provide support with include the techniques mentioned below.
Creating a safe environment at home
Begin by decluttering pathways – removing objects like cords, loose rugs or unnecessary furniture that might pose a tripping risk – and then setting up designated locations for items that the person with low vision frequently uses, allowing them to access these themselves.
Guide Dogs provides Orientation and Mobility Skills services to support you in this process. You can help your loved one maintain a consistent layout in the home so that they can confidently navigate the space without unexpected obstacles. Guide Dogs can also advise on tactile markers, such as raised stickers, textured surfaces, or Braille labels through the home.
Getting around
Orientation and Mobility Skills training is invaluable, but you can play an important role to encourage your loved one and accompany them when getting around in public spaces so they can feel confident and develop independence.
Setting up technologies
Start by acquiring and helping to configure assistive devices such as screen readers and/or magnifiers. Voice-controlled smart home gadgets, like Amazon Alexa or Google Home, can also simplify everyday tasks and enhance accessibility. Guide Dogs can support you and your loved on in configuring devices and providing training for those with low vision or blindness to use various assistive technologies.
Researching and contacting professional support
Connecting with professional support services can significantly enhance the quality of life for someone with blindness. Begin by researching healthcare services, such as low-vision specialists, occupational therapists, or counsellors who focus on vision impairment. Organizations like Guide Dogs Australia offer invaluable mobility and orientation training. Look into government and nonprofit programs, such as the National Disability Insurance Scheme (NDIS), to access financial aid, assistive devices, or home modifications. Peer support groups, whether local or online, can provide emotional connection and shared experiences.
Providing and receiving emotional support
Receiving a diagnosis of low vision or blindness often brings with it emotional challenges for both the people receiving that diagnosis and their family members.
Psychology and counselling services can play a vital role in helping those living with low vision or blindness as well as their families, but carers and family members can also support their loved one’s emotional wellbeing simply by being present, encouraging them to express their feelings, and exploring ways to support their independence – from helping organise assistive technologies and accompanying them to appointments through to finding community, hobby and peer groups they might like.
It’s important to remember to look after your own emotional wellbeing. Guide Dogs services – from psychology and counselling through to peer groups and funding support – can help take pressure off immediate family and carers and provide important guidance on everything from assistive technology to accessing the NDIS.
Remember that you have your own journey with a loved one living with low vision or blindness, and to be aware of how you are coping. Seeking help if you need it and managing your own emotional health can help you continue providing support.
iPhone accessibility settings
Smartphones have been mainstream technology for more than 15 years. In fact, for many of us, they’re essential technology, and we often hear our Clients say the same.
In this article, we’ll concentrate on accessibility settings for the iPhone, taking you through some of the features that our Clients find the most useful and giving a brief description of what they do.
It’s not an exhaustive list and it’s worth keeping in mind that not all these settings are necessarily available on older versions of the iPhone. We think it’s also important to mention that the best and most relevant accessibility settings for you will depend on your preferences, goals, level of vision, and other factors.
VoiceOver
VoiceOver is Apple’s own screen reader technology, and is built into iPhones (as well as other Apple products). It’s been designed to describe people, objects, text, and more. The voice descriptions can help you navigate what’s on your screen, whether you’ve connected a keyboard to your phone or using the touchscreen.
It’s available in dozens of languages and lets you choose from numerous different voices.
To activate VoiceOver, go to ‘Settings’ > ‘Accessibility’ > ‘VoiceOver’ and toggle it on.
Zoom
When you turn on Zoom in your iPhone settings, you’ll be able to magnify the screen, making it easier to read. You can choose to ‘zoom’ the whole screen or parts of it, and it’s been designed to work in combination with VoiceOver.
To activate Zoom, go to ‘Settings’ > ‘Accessibility’ > ‘Zoom’ and toggle it on. You can use gestures to magnify and de-magnify what you want to.
Display settings
The Display and Text Size section of the Settings menu lets you adjust things like colour filters (ideal for people with colour blindness or conditions like Albinism) to change contrast, and to invert colours. You can also change transparency levels and the shape of buttons.
To change these settings, go to ‘Settings’ > ‘Accessibility’ > ‘Display & Text Size,’ and choose from a variety of useful options.
Reduce Motion
For many people, certain effects on smartphones can trigger motion sensitivity, strain eyes, and cause discomfort (even motion sickness). The Reduce Motion option reduces many of these effects.
To turn it on, go to ‘Settings’ > ‘Accessibility’ > ‘Motion’ and choose the Reduce Motion option.
Siri
Although Siri isn’t specifically designed for people with low vision or blindness, it can be a helpful aid, capable of making calls, sending messages, setting reminders, and more, using only voice commands.
If Siri isn’t enabled, you can turn it on by going to ‘Settings’ > ‘Siri & Search’ and choosing to turn it on.
By the way, Siri is one of the virtual assistants we discuss in our article on Assistive Technology for the home.
Like, Siri, the Face ID and Touch ID phone unlock options aren’t designed only for people with low vision or blindness, but may be useful as an alternative to entering a password.
How you turn these options on will depend on the model of iPhone you have.
Our Assistive Technology Specialists can help ensure that you’re getting the most out of your digital devices, including your iPhone.
Intro to Assistive Tech for Students
Student learning can be tough for everyone. Luckily, if you’re a student with partial vision, blindness or other disabilities, there are a wide range of assistive technology tools and devices that enable you to reach—and exceed—your academic potential.
Whether you’re preparing for uni or preparing your child for their first day at school, assistive technologies offer valuable support for students of all ages and abilities. There are many different software programs and electronic devices designed to support the best possible learning experience for people with partial vision and blindness. With so many high-tech options, it can get overwhelming. Which assistive device is most helpful for a student with blindness What’s the most common assistive technology for people with partial vision
In this article, we’ll showcase some of the more common devices and how they can be used in general education. Remember though, the best assistive technology will depend on your unique preferences, abilities, and requirements. This should be used as a guide only: if you need more specific and personally tailored information, give us a call on 1800 484 333. You can also learn more about our assistive technology training service. In the meantime, let’s check out some of the most popular options for students with partial vision or blindness.
Screen readers are assistive technology tools that convert digital text into synthesised audio of a person reading text aloud. Screen readers are versatile tools for both teaching and learning, with a wide range of uses, features and functions. They’re particularly helpful for students who need to:
— Read websites. Screen readers can interpret the code and HTML structure of web pages, and support students to quickly identify information about headings, website links, buttons, and other website elements. This ensures students can browse the web and easily engage with any online learning management systems or course materials.
— Read documents. Screen readers can access and read a range of document formats, including text documents, PDFs and e-books.
— Read and write emails. Screen readers support students to read and write emails by reading the content aloud. They can also provide feedback and analysis on the text that is written in reply to the original email.
— Accessing software programs and other tools. Like with browsing websites on the internet, screen readers can make different software applications more accessible to students with disability. The screen reader can identify different aspects of a program’s user interface and providing spoken feedback and guidance to support people to use the program.
Text-to-speech software (also commonly referred to as TTS) offers some similar functionality to a screen-reader, but typically serves a range of different and distinct purposes for students with disability. While screen readers are comprehensive and high-tech devices that can read code, identify elements of websites and software programs, and more, text-to-speech software is usually used for:
— Proofreading lecture notes or essays
— Listening to lecture notes
— Reviewing and self-editing written work. By hearing your own content read aloud, students can better identify grammatical errors, fix any sentence structure issues, and improve overall confidence with writing.
— Participating in online discussions. Text-to-speech supports students with partial vision or blindness to read posts and comments in student forums or chat-based programs.
— Reducing eye strain and maintaining progress with studying efforts. Students with partial vision or blindness often experience eye strain when reading for extended periods. Text-to-speech provides an alternative and less intensive method for accessing content, reducing strain and enabling ongoing study for long periods of time.
You might be familiar with this type of assistive technology from using certain smartphones. Word prediction software is designed to improve typing and writing efficiency by predicting and suggesting common words that may feature next as students type. This reduces the need for extensive manual typing and can reduce the visual strain associated with searching for the right letter keys on keyboards or keypads. It is an effective technology to support students in:
— Reducing typos and spelling errors.
— Enhancing writing speed. With the support of word prediction software, students can be more efficient and productive as they select from suggested words rather than manually typing out entire words or phrases.
— Promoting more independent writing. Instead of focusing intently on typing, choosing from a range of suggested words allows students with partial vision or blindness to focus on the overall content and messaging of what they write.
— Assisting with more efficient note taking. Word prediction allows students to write notes faster and more efficiently when following along with a lecturer’s notes, ensuring they don’t miss any important ideas or concepts.
— Reducing writing fatigue. By streamlining the process associated with creating content, word prediction software can reduce the strain and fatigue associated with extensive manual writing sessions.
Speech-to-text software (STT) is also known as voice recognition or dictation software. While it’s not specifically designed as an assistive technology for students with disability, the functionality of STT means it can be a useful support for people who have difficulty with typing or other text input methods. If you’re a student with partial vision or blindness, it’s important to consider software programs with enhanced accessibility features and a user-friendly interface.
Speech-to-text can be useful for:
— Writing and completing assignments. Students can verbally express their ideas, making it faster and easier to complete written tasks.
— Dictating research or lecturer’s notes. Speaking observations aloud rather than writing them can streamline the process of compiling notes and reduce the fatigue associated with manual creation.
— Participating in online discussions. Many courses use forums or learning management systems to facilitate student engagement. Speech-to-text can be a valuable support in enabling students to contribute easily and efficiently.
Braille notetakers feature a refreshable braille display. This typically consists of a small row of dynamic braille cells featuring six or eight dots. These cells change dynamically to represent different braille characters and convey written content to students with partial vision or blindness. Braille notetakers can be used to:
— Participate in virtual meetings and classes. Some braille notetakers support virtual meeting applications, allowing students to participate in online discussions and read shared documents using braille.
— Manage calculations and mathematics. Many braille notetakers include calculators and features for working with equations.
— Display content from other devices. Braille notetakers can connect with computers, smartphones and other electronic devices, enabling students to read material in braille.
Keyboard alternatives.
There are many alternatives to traditional keyboards that are designed to better support students with partial vision, blindness, and other disabilities. These include:
— Large print keyboards with high contrast keys and easy to read print. Some keyboards feature different colour coding for each section of the keyboard (like numbers and function keys in comparison to letters), and large bold letters.
— Tactile keyboards with distinctive shapes or textures to guide students to different sections of the keyboard based on physical touch.
— Adaptive keyboards are designed with flexibility in mind, so that students with disabilities can customise different features and behaviours to meet specific needs or preferences. For example, you can program different keys to initiate different commands, adjust the layout of where certain keys are located on the board, and alter the sensitivity to better align with different typing styles.
Ready to learn more
If you’re ready to have a chat about the best assistive technology tools for you or your child, you can:
A screen reader is a kind of software designed to help people who have low vision or blindness to access digital content. It works by using text-to-speech which reads out loud the content displayed on the computer screen, including text, images, and other graphical elements.
Screen readers can also provide navigation assistance by reading out information about the structure and layout of a webpage, allowing the user to move quickly and efficiently through the content.
What you can read below is a general overview of how to use a computer screen reader. The specific steps and keyboard shortcuts you’ll need to use will depend on the screen reader software you’re working with. It’s a good idea to review the documentation or tutorial provided by the screen reader developer to get a more in-depth understanding of how to use the software.
1. Install the screen reader software
If you’re using a commercially available screen reader, you will need to purchase and install the software on your computer. If you are using an open-source screen reader, you can typically download the software for free from the developer’s website.
NDVA is a common example of free screen reader software while JAWS is a common paid screen reader software often purchased for professional or educational use. Sometimes screen readers come built into computers like Narrator for Windows or VoiceOver for Mac.
2. Turn on the screen reader
Once you’ve installed the screen reader, you’ll need to turn it on. This is usually done by pressing a specific keyboard shortcut, such as “Ctrl + Alt + N” for NVDA, or “Cmd + F5” for VoiceOver.
Screen readers won’t turn on automatically. They need to be opened – some use a shortcut to start and others don’t.
3. Navigate the screen
Screen readers can give information about what is shown on the screen using speech. You can use keyboard shortcuts to check certain elements on the screen, for example, “what is the title of the window I am in or to navigate contents like webpages, documents and file browsers.
Depending on the type of screen reader you use and your experience with screen readers, navigation can be complex, especially for people who are new to the technology. We’re always here to help you discover the right method for you and provide training.
4. Interact with elements
To interact with elements on the screen, such as buttons, links, and text fields, you’ll use keyboard shortcuts. For example, you might press “space bar” to activate a button or a link.
Some of the common ways you can interact include:
Moving between elements: To move between elements on the screen, such as buttons, links, and text fields, you might use “Tab” or the arrow keys. For example, you might use the up arrow key to move up to the previous element or the down arrow key to move down to the next element.
Activating buttons and links: To interact with buttons or links, you’ll typically use the “Space” key. The screen reader will provide speech feedback, allowing you to know what you’re interacting with.
Finding key information: Screen readers use keyboard commands and shortcuts to read certain elements of the screen For example, you might use Insert + T to have JAWS read the title of the open window.
Browsing the web: To browse the web with a screen reader, you’ll use the arrow keys to move between elements on a web page and “Space” to activate a link.
Here are some example of specific instances of screen reader use:
Sarah uses Caps Lock + T on her school laptop to have JAWS read the name of the document the teacher shared with her.
Trevor uses Control + Alt + N to start up NVDA while he reads through documents.
Alyce uses Insert + S to with Narrator get a summary of the webpage she is reading about mobility aids.
Len uses VO + A to repeat the last element read by VoiceOver.
5. Adjust the speech output
You can usually adjust the speech output of a screen reader–such as the volume, speed, and pitch–to suit your needs. This is usually done through the screen reader’s settings or preferences.
Need more info about assistive technology
There are many devices, tools and aids available to make your life easier. If you need help finding the right ones for you, take a look at our Assistive Technology resources.
Common types of tips you can attach to long canes
A cane tip is the rubber or ceramic part can be attached to the end of a long cane. It’s the part of the cane that comes into contact with the ground, and so is an essential component of the equipment, helping a person with low vision or blindness to detect obstacles and navigate their surroundings safely.
The type of tip used on a white cane can vary depending on the user’s needs and the environment they’re navigating. This article doesn’t recommend one type above another, but instead is an introduction to some of the common tips in Australia.
Before we start, we should mention that there are different brands of canes and cane tips. Again, this article isn’t attempting to rank or rate them. It is, however, important to keep in mind that a tip made by one manufacturer may not fit on a cane made by another.
The pencil tip
This is a small, very common tip that’s really lightweight. It gives you lots of feedback, helping you determine even small changes in the ground you’re travelling upon.
If there’s a downside to this tip, it’s that it can sometimes get caught on the surface you’re navigating. For that reason, if you’re using this tip you’ll want to use a lightweight feather touch. We often find that a person who prefers the two-point touch method (as opposed to constant contact) of cane use also prefers this kind of tip.
The pear tip and marshmallow tip
These tips are very similar to the pencil tip but are a little bit wider in the base, which is how they get their names. One looks like the fruit and the other looks a bit like the lolly.
Like the pencil tip, both of these tips are lightweight and will give plenty of feedback. But the pear and marshmallow tips are well-suited to both two-point touch and constant contact methods.
What’s the difference between these two tips Not a great deal–they’re different companies’ names for tips that serve essentially the same purpose as one another.
The ball race tip
This round tip, a little bit smaller than a golf ball, is designed to glide across the surface you’re travelling on, rotating as you move ahead.
Because it rotates, it tends to pick up a little bit less feedback than the pencil, marshmallow and pear tips. However, you may find that because it glides, it catches on the ground less than its lighter counterparts.
Some people find that maintaining a steady cane arc is more difficult with a ball race tip, simply because when you use a rotating tip, the cane tends to move a little bit further from left to right than it would with a fixed tip.
The rural tip
Similar in shape to the ball race tip, the rural tip is fixed; it doesn’t rotate as you use it.
Like the ball race tip, it provides less feedback than other tips, but is less likely to catch on any bumps you come across in your travels.
The Supaball rolling tip
The largest cane tip you can find is called the Supaball, and it’s produced by a company called Ambutech.
It’s almost the size of a tennis ball and is heavier than all the tips mentioned above. It also provides less feedback than some other tips, but is well-suited to travelling for longer distances, especially if the surface is relatively smooth.
The Bundu Basher
Another brand name, this tip is really unique. It’s thin, round-edged and shaped almost like a U. When you add it to the end of your cane it makes it look a little bit like a hockey stick.
It’s designed specifically for outdoor use, including bushland and heavy grassland, and its manufacturer recommends using it with a figure-eight method. It can be really useful in certain situations, but does require a bit of extra Orientation & Mobility Specialist training than would be the case with many of the tips mentioned above.
The ceramic cane tip
Another tip exclusive to Ambutech, the ceramic cane tip is shaped like a half a ball; the rounded half is the part that touches the ground.
It provides superior audio feedback from the environment with which it’s connecting. You’ll get unique sounds from different surfaces, helping you identify where you are and how the surface beneath you might have changed.
It’s small, so can get caught, but is well-suited to all cane use methods.
If you’d like help with cane techniques, you might find our article on tips for using a cane useful.
If you’d like some training or advice, you can get in contact with an Orientation & Mobility Specialist.
What is a Miniguide?
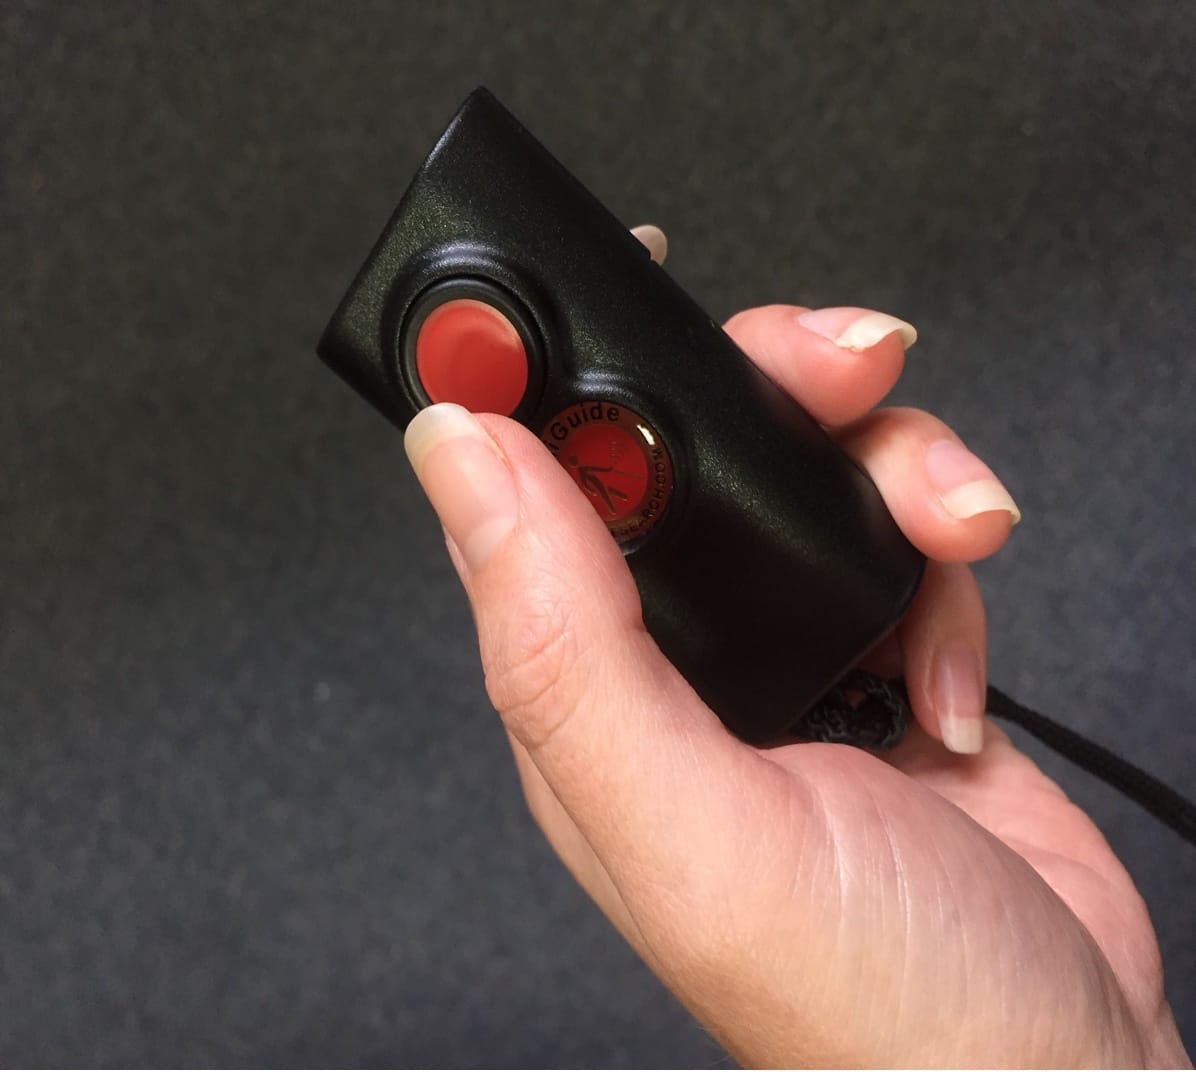
A Miniguide is a small, portable device designed to assist individuals who are visually impaired in navigating their surroundings. Mini-guides are often lightweight, compact, and easy to carry, making them ideal for use in a variety of environments, including busy public spaces, unfamiliar locations, and even in the home. They can be especially helpful for individuals who are new to using a cane or who have difficulty using a traditional long cane, as they offer a more discreet and convenient solution for navigating the world around them.
These devices typically use a combination of audio cues and vibrations to help users navigate and locate objects or obstacles. Some mini-guides may also incorporate GPS technology and other features, such as voice commands, to enhance their functionality and make them even more useful for people who are blind or have low vision. It is a secondary mobility aid that can be used in conjunction with a primary mobility aid, such as a long cane or a Guide Dog.
What is the Miniguide useful for?
Locating doorways and gaps
Determining if lift doors are open
Navigating around tables, chairs and office environments
Detecting overhanging branches
Locating bus, tram or taxi bays
Detecting idling vehicles at road crossings
Detecting parked cars, poles and street furniture
Detecting if a taxi is at a taxi rank and determining if it is a maxi taxi or regular taxi.
How do I use a Miniguide?
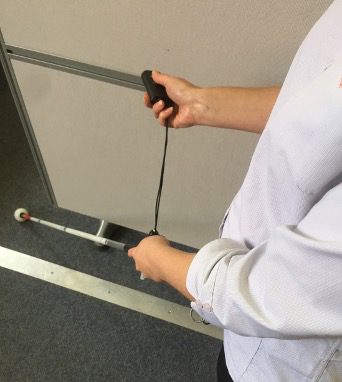
The Miniguide is held in the opposite hand to the primary mobility aid (for example: long cane or Guide Dog harness).
It can be held facing different directions depending on the environment. For example, you may hold it towards the wall if you are searching for an open doorway. When the button towards the top of the Miniguide is pressed, it emits an ultrasonic beam. If an object is located, the Miniguide vibrates and increases vibration intensity the closer the object is. If there is no object, the Miniguide does not emit a vibration.
The Miniguide can be set to different ranges depending on the environment, including eight metres, four metres, two metres, one metre and half a metre. The device can be used both indoors and outdoors.
The Miniguide is battery operated and has approximately 100 hours of use.
Orientation and Mobility (O&M) Specialists are qualified to provide training for the Miniguide to ensure safe and effective use.